
User Tools
Sidebar
admin:procedures
This is an old revision of the document!
Table of Contents
Λογαριασμοί
Δημιουργία
scylla
# cd /var/yp
# vi master.passwd (προσθήκη χρήστη/αποθήκευση)
# make
uranus
# accmake.sh <user>
gaia
# vi /etc/aliases (προσθήκη χρήστη στη σωστή ομάδα)
# newaliases
# setstats_student.sh <user>
titan-new (10.7.4.44)
# create_student_quotas.sh <user>
Διαγραφή
uranus
# accdel.sh <user>
gaia
# vi /etc/aliases (διαγραφή χρήστη)
# newaliases
# rm /var/mail/<user>
titan-new (10.7.4.44)
# pkusers --delete <user>
scylla
# cd /var/yp
# vi master.passwd (διαγραφή χρήστη/αποθήκευση)
# make
Αντίγραφο ασφαλείας
uranus
# cd <home dir parent>
# acctar.sh <user>
gaia
# cd /var/mail
# pigz <user>
# mv <user>.gz /mnt/accounts/mail
Πρόβλημα "error in service module" κατά την αλλαγή password (scylla)
# sh /etc/rc.d/yppasswdd restart
iLO firmware updates
HP iLO update to v1.96 (30/04/2014) for HP DL385(G1)
./CP023365.scexe –unpack=out
HP iLO2 update to v2.33 (20/03/2018) for HP DL380G6
filename: CP035238.scexe
To update firmware from the Linux operating system on target server: Download the SCEXE file to the target server. Execute: sh CP0XXXXX.scexe
To obtain firmware image for updating via iLO user interface, utilities, or scripting interface: Download the SCEXE file to a client running a Linux operating system. Execute: sh CP0XXXXX.scexe–unpack=directory This command will unpack the ilo2_xxx.bin into a user specified “directory”. If the directory does not exist, the unpacker will attempt to create it.
To use HP Smart Update Manager on the Firmware Maintenance CD version 7.50 and later: Place the Firmware Maintenance CD on a USB key using the USB Key Creator Utility. Copy CP0XXXXX.scexe to /compaq/swpackages directory on the USB Key. Follow HP Smart Update Manager steps to complete firmware update.
HP Procurve switches
Reset to defaults
Issue Description:
How do I reset factory defaults on the ProCurve Switch 1810G series?
Solution:
When the “Clear” button is pressed with the “Reset” button, any configuration changes you may have made through the switch console, the web browser interface, and SNMP management are removed, and the factory default configuration is restored to the switch.
Specific steps to execute the factory default reset on the switch are:
1. Using a small, thin tool with blunt ends (such as a paper clip), simultaneously press both the Reset and Clear buttons on the front of the switch.
2. Continue to press the Clear button while releasing the Reset button.
3. When all three Mode LEDs (Act, FDx, and Spd) begin to blink, release the Clear button.
The switch will then complete its self test and begin operating with its configuration restored to the factory default settings.
Note: After completing this procedure, there will be no password, the IP address will be returned to the default 192.168.2.10 acquired from DHCP, and all configuration settings will be returned to factory defaults.
Linux mdadm RAID
RAID 1+0
# mdadm --create /dev/md0 --level=1 --raid-devices=2 /dev/sda /dev/sdb
# mdadm --create /dev/md1 --level=1 --raid-devices=2 /dev/sdc /dev/sdd
# mdadm --create /dev/md2 --level=0 --raid-devices=2 /dev/md0 /dev/md1
HP Proliant servers SPP
Gen6-7 servers
Latest 2017.04
Gen1 servers
Latest 2014.06
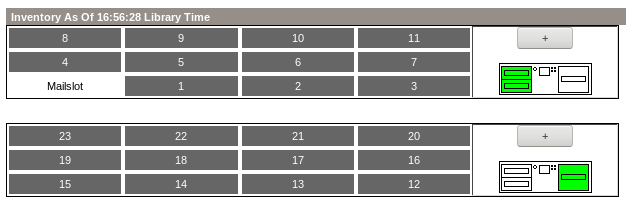
HP StorageWorks MSL2024 Tape Library
LTO 3 drive, 400/800GB
24 tapes changer
Reset admin password
Default service password: 42311324
new pass: 00000000
List SCSI devices
# lsscsi -g
[0:0:0:0]    cd/dvd  TEAC     DW-224E-R        C.AB  /dev/sr0   /dev/sg0
[2:0:0:0]    disk    ATA      WDC WD1002FBYS-0 0C06  /dev/sda   /dev/sg3
[3:0:0:0]    disk    ATA      WDC WD1002FBYS-0 0C06  /dev/sdb   /dev/sg4
[4:0:0:0]    disk    ATA      WDC WD5000AAKS-0 3B01  /dev/sdc   /dev/sg5
[5:0:0:0]    disk    ATA      WDC WD5000AAKS-0 3B01  /dev/sdd   /dev/sg6
[7:0:4:0]    tape    HP       Ultrium 3-SCSI   G54W  /dev/st0   /dev/sg1
[7:0:4:1]    mediumx HP       MSL G3 Series    2.40  /dev/sch0  /dev/sg2
Commands
tape drive control via mt tape changer control via mtx
load tape
# mtx -f /dev/sg2 load <tape #>
unload tape (to previous slot)
# mtx -f /dev/sg2 unload
check inventory
# mtx -f /dev/sg2 status
rewind tape
# mt -f /dev/nst0 rewind
dump/restore, mt etc. use /dev/st0 or /dev/nst0 (no rewind)
mtx uses raw SCSI device /dev/sg2
write from local file
# dd if=root.fs of=/dev/nst0 bs=4M status=progress
Media usage
| Tape # | Media loads |
|---|---|
| 1 | |
| 2 | |
| 3 | |
| 4 | |
| 5 | |
| 6 | |
| 7 | |
| 8 | |
| 9 | 116 |
| 10 | 102 |
| 11 | 72 |
| 12 | |
| 13 | |
| 14 | 155 |
| 15 | |
| 16 | |
| 17 | |
| 18 | |
| 19 | |
| 20 | |
| 21 | |
| 22 | |
| 23 | |
| 24 | Cleaning |
Variable block size
Ok, I think I've worked this out. TL;DR
Use dd with a large block size to read from the tape instead:
dd if=/dev/nst0 bs=1M | tar tvf -
Background
When you write to tapes, the data is written in units called blocks. These are like sectors on a hard disk. Where hard disk blocks were fixed at 512-bytes for many years and only recently moved to 4096-byte blocks, tape blocks can be set to any size you like.
The block size you wish to use is set with the setblk subcommand in mt-st:
mt-st -f /dev/nst0 setblk 512 # Use 512-byte blocks mt-st -f /dev/nst0 setblk 64k # Use 65536-byte blocks
When you issue a read operation to the drive, it will return data in block-sized chunks. You can't read half a block - the smallest amount of data you can read from a tape is one block, which of course could be any number of actual bytes depending on what the block size is.
This means if the program you are using supplies a 16kB memory buffer, you will be able to read up to 32 blocks at a time from the tape with 512-byte blocks as these fit exactly in the 16kB buffer. However you will not be able to read anything from the tape with 64kB blocks, because you can't fit even one of them into the 16kB buffer, and remember you can't read anything less than one whole block at a time.
Should you attempt to do this, by using a buffer that's too small for one block, the driver (in this case the st SCSI tape driver) will return a memory allocation error code to advise you that your read buffer is too small to hold even a single block.
To further complicate matters, some tape drives (apparently the LTO ones I am using) also support variable-sized blocks. This means the block size is determined by the size of each write operation and each block can be a different size to the last.
This mode is set with a block size of zero:
mt-st -f /dev/nst0 setblk 0 # Use variable-sized blocks
This is also the default option as - presumably, I am guessing here - it wastes less space with an incorrectly configured program. If, for example, you had set 4k blocks but your program only wrote data in units of 512 bytes at a time, there is a risk that each 512-byte chunk of data would take up 4k on the tape. Cause
If you now put everything together, you will realise that a tape can hypothetically have a 512-byte block followed by a 64kB block. If the program is reading the tape with a 16kB buffer, it will successfully read the first block, but then when it tries to read more, it won't be able to fit the following 64kB block in its buffer so the driver will return an error.
This explains why I was getting Cannot allocate memory errors most of the time, and occasionally I was able to get tar to extract the first few files but then I got the error again. I had not set the block size with mt-st so it had defaulted to variable-sized blocks when the tape was written, and now tar was using too small a buffer to read in some of those blocks.
tar has a couple of options for setting its own internal block sizes, namely –blocking-factor, –read-full-records, and –record-size, however these only work if tar is used to directly read and write to the tape.
Because I wrote to the tape through the mbuffer program to reduce tape shoe-shining, the block size in the tar archive no longer matched the block size on the tape. This meant –blocking-factor had little effect - it would allow the first block on the tape to be read, which includes a header telling tar what the blocking factor is supposed to be, wherein it switches to that and ignores the value given on the command line. This means the second and subsequent blocks can no longer be read! Solution
The solution is to use another program to read from the tape - one that can have the read buffer size set to a value large enough to hold the biggest block we are likely to see.
dd works for this, and in a pinch this works:
dd if=/dev/nst0 bs=256k | tar tvf -
You may need to increase 256k if your tape has larger blocks on it, but this worked for me. 1M also works fine so it doesn't appear to matter if the value is too large, within reason.
admin/procedures.1562335367.txt.gz · Last modified: 2019/07/05 17:02 by peppe
Page Tools
Except where otherwise noted, content on this wiki is licensed under the following license: CC Attribution-Share Alike 4.0 International
